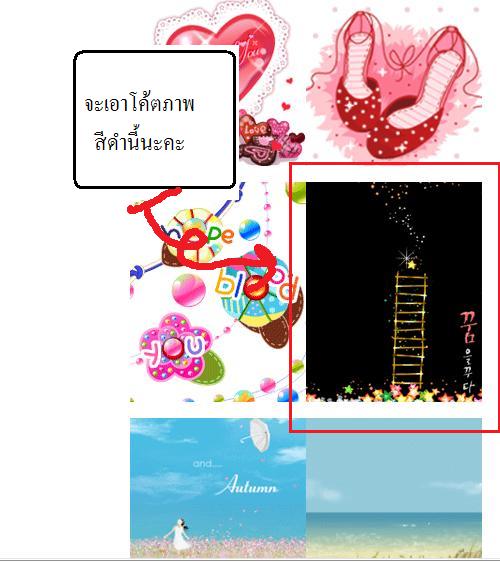
มาดูวิธีการเอาโค๊ดภาพคะ
คลิก "ขวา" นะคะ วิธีคลิกขวาเอาโค้ตภาพ
ซึ่งหลายท่านยังงงอยู่ว่าแล้วจะเอาโค๊ดภาพมาได้ไงหว่าทำตามนี้เลยนะคะ
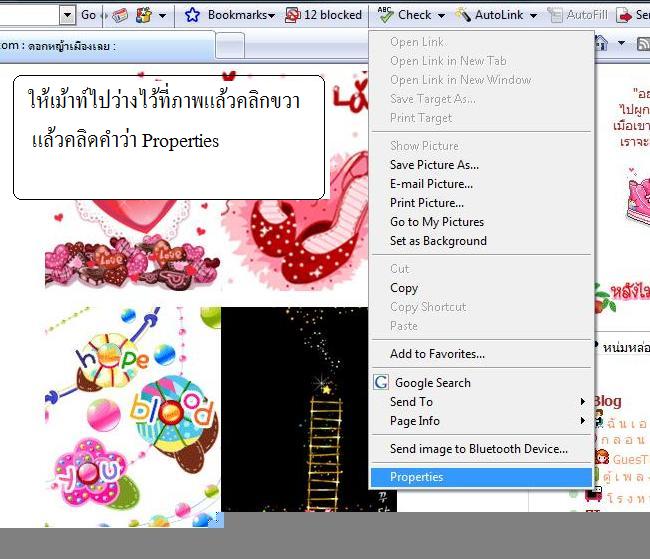
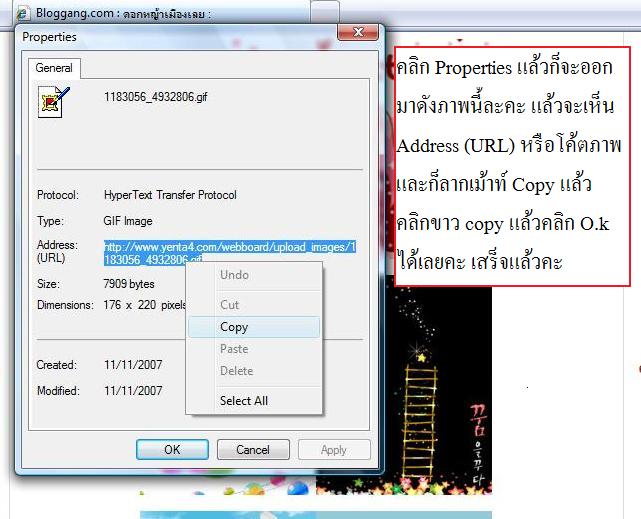
แค่นี้เราก็ได้Urlภาพแล้วค่ะเอาไปวางตรงโค๊ดนะคะเช่น
<style
type="text/css"
media="screen">
div#footer
{background-image:url("http://i648.photobucket.com/albums/uu208/mamamai_2009/nt19.gif");}
</style>
ขอบคุณที่มาวิธีทำของบล๊อกคุณดอกหญ้าเมืองเลยค่ะ
http://www.bloggang.com/viewblog.php?id=dyml&date=13-11-2007&group=20&gblog=2


โค๊ดห้องแซทเหมือนพิมข้างล่างค่ะ
เอาไปวางที่ช่องแก้ไขบล๊อก
<embed src="http://www.xatech.com/web_gear/chat/chat.swf" quality="high" bgcolor="#000000" width="540" height="405" name="chat" FlashVars="id=47237518" align="middle" allowScriptAccess="sameDomain" type="application/x-shockwave-flash" pluginspage="http://xat.com/update_flash.shtml" /><br><small><a target="_BLANK" href="http://xat.com/web_gear/?cb">Get your own Chat Box!</a> <a target="_BLANK" href="http://xat.com/web_gear/chat/go_large.php?id=47237518">Go Large!</a></small><br><img style="visibility:hidden;width:0px;height:0px;" border=0 width=0 height=0 src="http://counters.gigya.com/wildfire/IMP/CXNID=
2000002.11NXC/bT*xJmx*PTEyMzA*NTM3NTUwMzEmcHQ9MTIzMDQ1Mzc3
MTc4MSZwPSZkPSZnPTImdD*mbz*yY2ZjMTk5MzNiZmY*MTk5ODM5NWE5MzE*MjU1YjljMQ==.gif" />


(ให้ใส่ตรงช่องแก้ไขบล็อก)
โค๊ดตัวหนังสือพร้อมภาพไหลวนขวาค่ะ
<marquee direction=right scrollamount=2><img src=ใส่urlภาพค่ะ> ใส่ข้อความ</marquee>


(ให้ใส่ตรงช่องแก้ไขบล็อก)
โค๊ดใส่บีจีที่อยู่ส่วนล่าง
<style
type="text/css"
media="screen">
div#footer
{background-image:url("URL ภาพ background
ที่ต้องการ");}
</style>


html
{border-style: groove;
border-width: 9px;
border-color: #038ef9;}
โค๊ดใส่กรอบหน้าเว๊บ
(ใส่ตรงช่องตกแต่งบล๊อกนะคะ)
ดูโค๊ดสีที่นี่ได้เลยค่ะ
http://sukumal.brinkster.net/meaploy/angel/color.html
กรอบสีน้ำเงินอยากเปลี่ยนก็เอาโค๊ดรหัสสีไปเปลี่ยนความหนาก็เปลี่ยนตัวเลขนะคะ
โค๊ดตัวการ์ตูนวิ่งไปทั่วหน้าบล๊อกเรา
ให้ใส่ตอนที่เราวางงานตรงบนสุดของhtml
เหมือนดอกไม้ร่วง


<script type="text/javascript"
src="http://www.geocities.com/madnilz/pengueinilz.js"></script>

<script type="text/javascript"
src="http://www.geocities.com/madnilz/jason.js"></script>


<script type="text/javascript"
src="http://www.geocities.com/madnilz/letterheart.js"></script>


<script type="text/javascript"
src="http://www.geocities.com/madnilz/dogdog.js"></script>


<script type="text/javascript"
src="http://www.geocities.com/madnilz/dance.js"></script>

<script type="text/javascript"
src="http://www.geocities.com/madnilz/ding1.js"></script>

<script type="text/javascript"
src="http://www.geocities.com/madnilz/ding2.js"></script>

<script type="text/javascript"
src="http://www.geocities.com/madnilz/ding3.js"></script>
<script type="text/javascript"
src="http://www.geocities.com/nilznilz/ding4.js"></script>
 ต่อด้วยวิธีทำภาพที่ไหลขึ้น.
|
เห็นรูปน่ารักดีก็เลยจัดโคดข้อความวิ่งบนรูปมาให้ค่ะ ดูตัวอย่างการใส่ขนาด-ใส่สีของตัวพิมพ์ และการวางโคดด้านล่างค่ะ ... โคดใส่ขนาด และสีของตัวพิมพ์ <font size="2" color="#ffffcc">.เขียนข้อความ.</font> รูปมันเล็กไปถ้าเราเขียนข้อความยาวๆโดยที่ไม่จัด ก่อนจะทำให้วางโคดแล้วออกมาไม่สวยค่ะ ใส่โคดตัวนี้ <br /> สำหรับเว้นบรรทัด ดูตัวอย่างการจัดข้อความ+การเว้นบรรทัดค่ะ
|
|
<table
border="0" cellspacing="5" cellpadding="0" width="190"
align="center" style="height: 360px; background-image:
url('..ใส่..http://..ของรูป..')"><tbody><tr><td
align="center" valign="middle"><marquee width=180 height=350
direction=up scrollamount=2>..ใส่ข้อความที่นี่..</marquee></td></tr></tbody></table> |
|
|
|
|
ดูโค้ดสีได้จากลิงค์นี้จ้า http://www.zalim-code.com/codeconlor.htm
ภาพน่ารักแจกๆๆ ไว้หัดทำจ้า...จะเหมือนตัวหนังสือที่ไหลอยู่ข้างล่างค่ะ..ทำตามได้เลยค่ะ(วางลงตรงช่องแก้ไขบล๊อกค่ะ)
 |
|
 |
 |
 |
 |
 |
 |
 |
 |
 |
 |
 |
 |
 |
 |
 |
 |
 |
 |
 |
 |
 |
 |
 |
 |
 |
 |
 |
 |
 |
 |
 |
 |
ถ้าอยากได้ภาพน่ารักอีก เข้ามาลิงค์นี้เลยจ้า
ภาพการ์ตูนเกาหลีน่ารัก
http://korea-cartoon.blogspot.com/
ภาพอาร์ทสุดเก๋ไม่เหมือนใคร
http://art-emopunk-graphic.blogspot.com/
โค๊คเมาส์ค่ะใส่รูปอะไรก็ลอยขึ้นฟ้า...ใส่ช่องแก้ไขบล๊อกค่ะ
<SCRIPT language=JavaScript>
<!-- Begin
Image0 = new Image();
Image0.src = "url รูปภาพค่ะ";
Amount = 20;
Ymouse = -50;
Xmouse = -50;
Ypos = new Array();
Xpos = new Array();
Speed = new Array();
rate = new Array();
grow = new Array();
Step = new Array();
Cstep = new Array();
nsSize = new Array();
ns = (document.layers)?1:0;
(document.layers)?window.captureEvents(Event.MOUSEMOVE):0;
function Mouse(evnt) {
Ymouse=(document.layers)?evnt.pageY-20:event.y-20;
Xmouse=(document.layers)?evnt.pageX:event.x;
}
(document.layers)?window.onMouseMove=Mouse:document.onmousemove=Mouse;
for (i = 0; i < Amount; i++) {
Ypos[i] = Ymouse;
Xpos[i] = Xmouse;
Speed[i] = Math.random()*4+1;
Cstep[i] = 0;
Step[i] = Math.random()*0.1+0.05;
grow[i] = 8;
nsSize[i] = Math.random()*15+5;
rate[i] = Math.random()*0.5+0.1;
}
if (ns) {
for (i = 0; i < Amount; i++) {
document.write("<LAYER NAME='sn"+i+"' LEFT=0 TOP=0><img
src="+Image0.src+" name='N' width="+nsSize[i]+"
height="+nsSize[i]+"></LAYER>");
}
}
else {
document.write('<div
style="position:absolute;top:0px;left:0px"><div
style="position:relative">');
for (i = 0; i < Amount; i++) {
document.write('<img id="si" src="'+Image0.src+'"
style="position:absolute;top:0px;left:0px;filter:alpha(opacity=90)">');
}
document.write('</div></div>');
}
function MouseBubbles() {
var hscrll =
(document.layers)?window.pageYOffset:document.body.scrollTop;
var wscrll =
(document.layers)?window.pageXOffset:document.body.scrollLeft;
for (i = 0; i < Amount; i++){
sy = Speed[i] * Math.sin(270 * Math.PI / 180);
sx = Speed[i] * Math.cos(Cstep[i] * 4);
Ypos[i] += sy;
Xpos[i] += sx;
if (Ypos[i] < -40) {
Ypos[i] = Ymouse;
Xpos[i] = Xmouse;
Speed[i] = Math.random() * 6 + 4;
grow[i] = 8;
nsSize[i] = Math.random() * 15 + 5;
}
if (ns) {
document.layers['sn'+i].left = Xpos[i] + wscrll;
document.layers['sn'+i].top = Ypos[i] + hscrll;
}
else {
si[i].style.pixelLeft = Xpos[i] + wscrll;
si[i].style.pixelTop = Ypos[i] + hscrll;
si[i].style.width = grow[i];
si[i].style.height = grow[i];
}
grow[i] += rate[i];
Cstep[i] += Step[i];
if (grow[i] > 24) grow[i] = 25;
}
setTimeout('MouseBubbles()', 10);
}
MouseBubbles();
// End -->
</SCRIPT>
********ติดตามโค๊ดต่อไปค่ะ...
บันทึกนี้มีหลากหลายค่ะ
ลองเอาไปใช้ดูนะคะ
น่ารักมาก...มีภาพที่ดิ้นน่าจอ..ด้วยค่ะ
div#subtitle {font-size:big; color:#FFFF99;}div#container {; background:#F5DEB3;}div#content2 {background:#FFEBCD;}body{ background:#F5DEB3;background-image:url(
http://www.whenifallinlove.net/diary/images_background/bg10//bg006.gif);background-repeat: repeat;} div#title{padding: 20px 6px 35px; font-size: big; color:#CC0000; background:#F5DEB3; background-image:url(http://i448.photobucket.com/albums/qq202/yamiejung15/qw78.gif);background-repeat:no-repeat;background-position:right; ;}
form{border: solid 2px #7FFF00; background-image:url(http://i183.photobucket.com/albums/x147/me2009_2007/ww-11.jpg);
background-repeat:repeat;}
<style type="text/css" media="screen">
div#title span {;}
div#content2 {;background-image: url("http://www.bloggang.com/data/oley/picture/1170119056.gif");}
</style>
<style type=text/css>textarea{;;background:url(http://i183.photobucket.com/albums/x147/me2009_2007/cpp-47.gif);color=#038ef9; font-family : MS Sans Serif; font-size:14pt; }</style>
คุณครูอรวรรณค่ะเอาโค๊ดนี้ไปวางที่ตกแต่งบล๊อกนะคะ..(ลบของคุณครูออกก่อนจะเอาไปเปลี่ยนบันทึกไหนก็ลบอันเก่าของเดิมให้หมดนะคะ
ทุกอย่างจะเหมือนหน้าสาระเมล์อะคะสีเขียวเดียวพิมเปลี่ยนใหม่
>.สวัสดีพิมพ์น้องต้องขอบคุณที่มาสอน
>. ลองหลายตอนหลายทีทำมิได้
>.ลากเม้าหลายทีคลิกชักตาลาย
>>ตกม้าตายตอนคลุมดำจำต้องจอด.....
.ความพยายามอยู่ที่ไหน มันก็อยู่ที่นั้นต้องพยายามจะเอาการบ้านมาส่งครูพิมญ์ครับ
เมื่อ จ. 18 พฤษภาคม 2552 @ 23:38
1298546 [ลบ] [แจ้งลบ]
>.สวัสดีพิมพ์น้องต้องขอบคุณที่มาสอน
>. ลองหลายตอนหลายทีทำมิได้
>.ลากเม้าหลายทีคลิกชักตาลาย
>>ตกม้าตายตอนคลุมดำจำต้องจอด.....
.ความพยายามอยู่ที่ไหน มันก็อยู่ที่นั้นต้องพยายามจะเอาการบ้านมาส่งครูพิมญ์ครับ
********
อาจารย์ติดขัดตรงไหนค่ะ
คอมเม้นแจ้งพิมด้วยค่ะ
จะได้ไขข้องถูกต้องบางทีพิมก็อธิบายไม่ถูก
แค่วางตำแหน่งผิดนิดมันก็ไม่ขึ้นภาพแล้วค่ะ..บอกพิมด้วยนะคะทุกท่านเลยนะคะที่เข้ามาศึกษา
วันนี้มีน้องพิมมาสอนตกแต่งบล็อก เกือบตกม้าตายเหมือนคุณวอญ่า
แต่น้องพิมสอนเก่งมาก จนทำได้แล้ว ไชโย
พี่ไก่ประกายเคยสอนให้แล้วก็ลืมค่ะ
ลูกศิษย์หลังห้องนะคะ น้องพิม อิอิ
ขอบคุณอีกครั้งนะคะ
ขอขอบคุณ"แบ่งปันฝันงาม"ที่ให้โอกาสได้เห็นภาพน่ารักๆนะคะ
เมื่อ อ. 19 พฤษภาคม 2552 @ 00:02
1298555 [ลบ] [แจ้งลบ]
***
เมื่อ พฤ. 21 พฤษภาคม 2552 @ 14:45
1302440 [ลบ] [แจ้งลบ]
ขอขอบคุณ"แบ่งปันฝันงาม"ที่ให้โอกาสได้เห็นภาพน่ารักๆนะคะ
*************
ยินดีค่ะ..ยิ้ม
เมื่อ จ. 25 พฤษภาคม 2552 @ 23:45