OpenBravo ERP เป็นโอเพนซอร์ส ERP ที่ออกแบบมาให้เหมาะสมกับธุรกิจ SMEs ซึ่งพัฒนาเป็นเว็บแอพลิเคชั่น รวบรวมความสามารถหลายๆ เรื่องทั้งในเรื่อง procurement, warehouse management, project management, service manangement, production management และ financial managment อยากทราบรายละเอียด feature ของ OpenBravo อ่านเพิ่มเติมได้ที่ http://www.openbravo.com/product/product-features/

วันนี้เราจะมาติดตั้ง OpenBravo อย่างเซียนกัน มาทำความเข้าใจกันก่อนเครื่องที่ผมใช้มีชื่อว่า server1.example.com มี IP address 192.168.0.100 ซึ่งค่าเหล่านี้อาจไม่เหมือนค่าที่คุณใช้ก้อปรับเปลี่ยนไปตามที่คุณต้องการ ครับ มาเริ่มต้นกันเลยครับ อันดับแรก แปลงร่างเป็น root กันก่อนด้วยคำสั่ง
$ sudo su
เมื่อเป็น root แล้วมาเริ่มติดตั้งโปรแกรมที่ต้องใช้กับ OpenBravo กันก่อนตัวแรกคือ PostgreSQL ติดตั้ง PostgreSQL ด้วยคำสั่ง
# apt-get install postgresql-8.3
จากนั้นตั้งค่ารหัสผ่าน admin ให้กับ PostgreSQL
# sed -i 's/ident sameuser$/trust/' /etc/postgresql/8.3/main/pg_hba.conf
# /etc/init.d/postgresql-8.3 restart
เปิด PostgreSQL shell ขึ้นมา
# psql -U postgres
จากนั้นตั้งค่า password ที่เราต้องการ
alter role postgres with password 'yourrootsqlpassword';
\q
แก้ตรง yourrootsqlpassword เป็น password ที่คุณต้องการนะครับ จากนั้นกำหนด trust ให้ใหม่
# http://www.sony.net/Products/Linux/Download/DSC-G3.html
# /etc/init.d/postgresql-8.3 reload
ตอนนี้เราก้อได้ PostgreSQL กันแล้ว ต่อมาเราต้องติดตั้ง Java JDK โดยใช้คำสั่ง
# apt-get install sun-java6-jdk
หลังจากนั้นสั่งให้ Ubuntu เรียกใช้ Sun Java แทน OpenJava โดยใช้คำสั่ง
# update-java-alternatives -s java-6-sun
# echo 'JAVA_HOME="/usr/lib/jvm/java-6-sun"' | tee -a /etc/environment
ให้คุณ Logout จากระบบแล้ว Login ใหม่อีกครั้ง แปลงร่างเป็น root อีกรอบโดยใช้คำสั่ง
$sudo su
ตอนนี้ JAVA_HOME จะมีค่าเป็น /usr/lib/jvm/java-6-sun เรียบร้อยแล้ว และใช้งานได้ทุกครั้งที่คุณ Login ขั้นตอนถัดไปเรามาติด Apache Tomcat กัน โดยใช้คำสั่ง
# apt-get install tomcat5.5 tomcat5.5-admin tomcat5.5-webapps
จากนั้น config tomcat ในไฟล์ /etc/init.d/tomcat5.5 อีกนิดหน่อยเปลี่ยน TOMCAT5_SECURITY from yes to no
# vi /etc/init.d/tomcat5.5
[...]
# Use the Java security manager? (yes/no)
#TOMCAT5_SECURITY=yes
TOMCAT5_SECURITY=no
[...]
จากนั้น restart Tomcat ด้วยคำสั่ง
# /etc/init.d/tomcat5.5 restart
ทีนี้มาตรวจสอบดูครับว่า Tomcat start ให้เราจริงหรือเปล่าโดยใช้คำสั่ง
# netstat -tap | grep jsvc
Tomcat จะ run อยู่บน port 8180 ดังนี้
root@server1:~# netstat -tap | grep jsvc
tcp6 0 0 [::]:8009 [::]:* LISTEN 7865/jsvc
tcp6 0 0 [::]:8180 [::]:* LISTEN 7865/jsvc
root@server1:~#
จากนั้นเรามาตั้ง Evironment Variable กันอีกนิดหน่อย คือกำหนด CATALINA_HOME, CATALINA_BASE และ CATALINA_OPT ดังนี้
# echo 'CATALINA_HOME="/usr/share/tomcat5.5"' | tee -a /etc/environment
# echo 'CATALINA_BASE="/var/lib/tomcat5.5"' | tee -a /etc/environment
# echo 'CATALINA_OPTS="-server -Xms384M -Xmx512M"' | tee -a /etc/environment
ให้ logout และ login ใหม่ครับ แล้วแปลงร่างเป็น root อีกรอบ
$ sudo su
ตอนนี้เราก้อจะมี CATALINA_HOME, CATALINA_BASE, CATALINA_OPTS ทุกครั้งที่เรา login ครับ
ตอนนี้เราก้อได้ PostgreSQL, Sun Java, และ Apache Tomcat เรียบร้อยแล้ว ขั้นตอนต่อไปเรามาติดตั้ง OpenBravo ERP กันครับ เปิดเบราเซอร์ไปที่ http://sourceforge.net/projects/openbravo/ แล้วดาวน์โหลด OpenBravo ERP installer (เลือกตรง 02-openbravo-installers ในหน้าดาวน์โหลด) หรือใช้คำสั่งดังนี้
# cd /tmp
# wget http://surfnet.dl.sourceforge.net/sourceforge/openbravo/OpenbravoERP_2.4...
จากนั้นเปลี่ยนสิทธิ์ของไฟล์ให้ execute ได้
# chmod +x OpenbravoERP_2.40-linux-installer.bin
จากนั้นเริ่มต้นติดตั้ง OpenBravo ERP กันได้เลยครับ
# ./OpenbravoERP_2.40-linux-installer.bin
ตัวติดตั้งจะเป็น text mode ง่ายๆ ครับ ตอบ Yes. No. Ok อะไรประมาณนี้ เริ่มต้นจากโปรแกรมจะแนะนำให้เรารู้เกี่ยวกับการติดตั้ง กด Enter เพื่ออ่าน License Agreement จากนั้นยอมรับ License Aggreement พิมพ์ yes
Do you accept this license? [y/n]: <-- y
ก่อนการติดตั้ง โปรแกรมจะถามเราอีกนิดหน่อยให้ตอบดังนี้
Please specify the directory where Openbravo ERP will be installed
[/opt/OpenbravoERP]: <-- ENTER
Please specify a directory for the Openbravo ERP attachments
[/opt/OpenbravoERP/AppsOpenbravo/attachments]: <-- ENTER
Installation mode
Please select the installation mode you wish to perform
[1] Complete
The database and the application server in the same computer
[2] Distributed
The database and the application server in different computers
Please choose an option [1] : <-- ENTER
Please select the installation type you wish to perform
[1] Standard
Installs the database and sets up the application server.
Recommended.
[2] Development
Installs the database and and sets up the application server
through a compilation process.
Recommended for developers.
Please choose an option [1] : <-- ENTER
Please specify the directory where the JDK is located
[/usr/lib/jvm/java-6-sun]: <-- ENTER
Please specify the location where the Ant executable is located
[/usr/share/ant/bin/ant]: <-- ENTER
Please specify the directory where Tomcat is located.
In case of having Tomcat split into 2 directories, select the one containing the webapps directory
[/var/lib/tomcat5.5]: <-- ENTER
Please select a database
[1] PostgreSQL
[2] Oracle
Please choose an option [1] : <-- ENTER
Please specify the directory where the binaries of the PostgreSQL installation are located (psql, pg_restore, vacuumdb)
[/usr/bin]: <-- ENTER
Please enter the IP address of the PostgreSQL database
Database host [localhost]: <-- ENTER
Please enter the port of the PostgreSQL database
Database port [5432]: <-- ENTER
Enter the password for your "postgres" administrator user
Password : <-- yourrootsqlpassword (รหัสผ่าน admin ของ PostgreSQL ที่ตั้งไว้ตอนแรก)
Retype password : <-- yourrootsqlpassword
Please enter the name of the PostgreSQL database
Database name [openbravo]: <-- ENTER
Please enter a username for the Openbravo ERP PostgreSQL database
Username [tad]: <-- ENTER
Please enter a password for the new database user
Password : <-- tadsqlpassword (รหัสผ่านสำหรับผู้ใช้ tad)
Retype password : <-- tadsqlpassword
Enter a context name.
This is used in the URL to access Openbravo ERP:
http://<ip_address>:<port>/context_name
Context name [openbravo]: <-- ENTER
Please select the preferred date and time formats
Date format
Date format
[1] DD MM YYYY
[2] MM DD YYYY
[3] YYYY MM DD
Please choose an option [1] : <-- ENTER
Date separator
[1] -
[2] /
[3] .
[4] :
Please choose an option [1] : <-- ENTER
Time format
[1] 12h
[2] 24h
Please choose an option [2] : <-- ENTER
Time separator
[1] :
[2] .
Please choose an option [1] : <-- ENTER
Should the installer populate the database with demo data?
[Y/n]: <-- ENTER
Setup is now ready to begin installing Openbravo ERP on your computer.
Do you want to continue? [Y/n]: <-- ENTER
รอโปรแกรมติดสักพัก ไม่ต้องรีบร้อนครับ
Please wait while Setup installs Openbravo ERP on your computer.
Installing
0% ______________ 50% ______________ 100%
#########################################
----------------------------------------------------------------------------
Setup has finished installing Openbravo ERP on your computer.
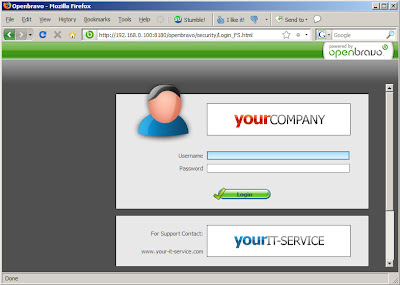
เมื่อติดตั้งเสร็จเราก้อสามารถเข้าไปใช้งาน OpenBravo ได้แล้ว เปิดเบราเซอร์ไปที่ http://server1.example.com:8180/openbravo or http://192.168.0.100:8180/openbravo เข้าสู่ระบบด้วยชื่อผู้ใช้ Openbravo และรหัสผ่าน openbravo

เท่านี้ก้อได้ ERP สำหรับ SMEs ให้กันแล้วครับ เอ้ามาลองคำนวนค่าใช้จ่ายเล่นๆ ในการติดตั้ง ERP สำหรับ SMEs เราลงทุนเครื่อง Server 1 ตัว Server 1U Asus RS120-E5/PA4 ราคาอยู่ไม่เกิน 40,000 บาท ส่วน Ubuntu 8.10 และ OpenBravo ERP เราสามารถดาวน์โหลดมาใช้ได้เลย หากไม่อยากดาวน์โหลด Ubuntu ก้อสามารถติดต่อขอรับแผ่น Ubuntu Server กับโครงการ Shipit ของ Cannonical ได้ ถ้าไม่ต้องการรอก้อสั่งซื้อจาก ShopIt ของ Ubuntu Club ได้ หากไม่คิดค่าลงทุนเรื่องเครื่อง Server เราก้อลดต้นทุนในการหา ERP Solution ที่ใช้งานได้มาใช้สักตัวได้เยอะเลยล่ะครับ เรียกได้ว่าเหมาะกับ SMEs ที่อยากได้ ERP Solution มาให้งานครับ