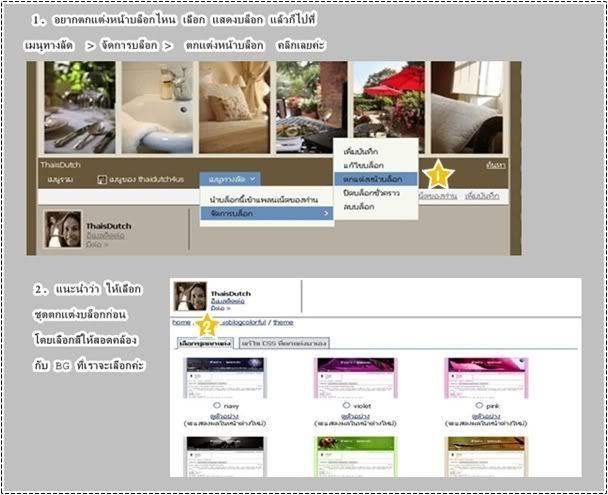
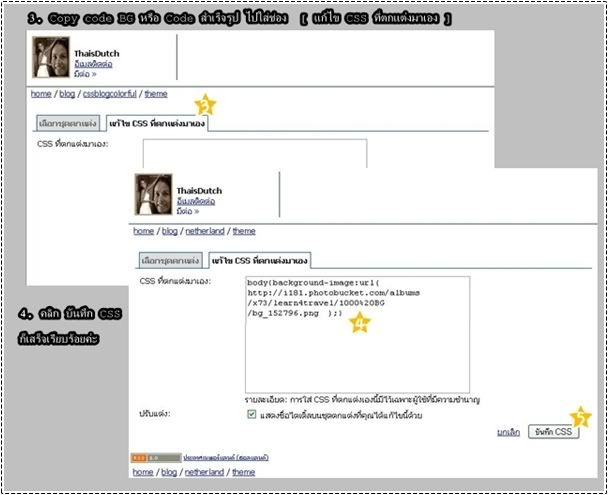
Code สำหรับใส่ BG ชั้นนอกค่ะ
1. ใส่ BG แบบ tile
body{background-image:url(ใส่ URLของภาพที่จะใช้);}
2. ใส่ BG แบบ fixed ไม่ให้ BG เลื่อน ขึ้น-ลง ตาม scrollbar
body{background-attachment: fixed;background-image:url(ใส่ URLของภาพที่จะใช้);}
3. ใส่ bg โดยใช้สี
body{background:ใส่สี Bg ที่ต้องการ}
4. ใส่ BG ให้ภาพอยู่..กลางบล็อก
Body {background-image:url("ใส่ URLของภาพที่จะใช้");background-position:center;background-repeat: no-repeat;background-attachment: fixed;background-color: ใส่สี Bg ที่ต้องการ;}
5. ใส่ BG ให้ภาพอยู่..มุมขวาบน
Body {background-image:url("ใส่ URLของภาพที่จะใช้");background-position:right top;background-repeat: no-repeat;background-attachment: fixed;background-color: ใส่สี Bg ที่ต้องการ;}
6. ใส่ BG ให้ภาพอยู่..มุมขวากลาง
Body {background-image:url("ใส่ URLของภาพที่จะใช้");background-position:right center;background-repeat: no-repeat;background-attachment: fixed;background-color: ใส่สี Bg ที่ต้องการ;}
7. ใส่ BG ให้ภาพอยู่..มุมขวาล่าง
Body {background-image:url("ใส่ URLของภาพที่จะใช้");background-position:right bottom;background-repeat: no-repeat;background-attachment: fixed;background-color: ใส่สี Bg ที่ต้องการ;}
8. ใส่ BG ให้ภาพอยู่..มุมซ้ายบน
Body {background-image:url("ใส่ URLของภาพที่จะใช้");background-position:left top;background-repeat: no-repeat;background-attachment: fixed;background-color: ใส่สี Bg ที่ต้องการ;}
9. ใส่ BG ให้ภาพอยู่..มุมซ้ายกลาง
Body {background-image:url("ใส่ URLของภาพที่จะใช้");background-position:left center;background-repeat: no-repeat;background-attachment: fixed;background-color: ใส่สี Bg ที่ต้องการ;}
10. ใส่ BG ให้ภาพอยู่..มุมซ้ายล่าง
Body {background-image:url("ใส่ URLของภาพที่จะใช้");background-position:left bottom;background-repeat: no-repeat;background-attachment: fixed;background-color: ใส่สี Bg ที่ต้องการ;}
โค๊ตทำการ์ดอวยพรในโอกาสต่างๆ แบบง่ายๆค่ะ
<table border="0" cellspacing="5" cellpadding="5" align="center" style="background-color: #ff00ff"><tbody><tr><td align="center" valign="middle" style="border: 2px dotted #ffffff"><img src="ใส่..http://ของรูป" border="0" ></td><td align="center" valign="middle" style="border: 2px dotted #ffffff; width: 173px; height: 240px">เขียนข้อความ</td></tr></tbody></table>
คำอวยพรของท่าน
โค๊ตสำหรับใส่กรอบข้อความในบล็อกค่ะ
ลักษณะขอบกรอบแบบต่างๆ
2px solid
2px dotted
2px dashed
2px groove
2px ridge
4px double
2px outset
2px inset
โค๊ต ทำให้เมนูมีมิติ และสีสันค่ะ
พื้นสี
A:link, A:visited { text-decoration: none }
A:hover { border: 2px outset โค๊ตสีขอบ;background:โค๊ตสี);}
ใช่พื้น บีจี ต่างๆ
A:link, A:visited { text-decoration: none }
A:hover { border: 2px outset โค๊ตสีขอบ;background-image:url(ใส่ URL ของ BG);}
ที่มา : Goodle > CSS hover
เปลี่ยน cursor เมาส์ ค่ะ copy code ไปวางได้เลยค่ะ